2016 Chilcomb Down formation


|
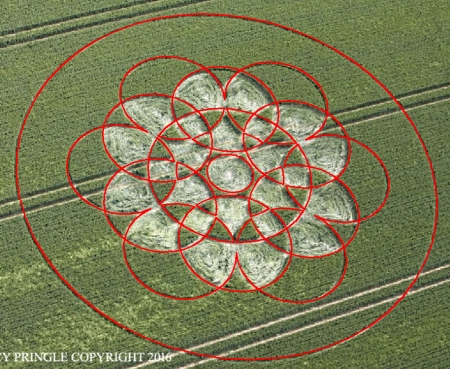
Reconstruction of the 2016 Chilcomb Down formation | ||
| 1. |
| Draw a circle. Draw and extend the horizontal and vertical centerlines. |
| 2. |
| Copy circle 1 to its righthand intersection with the horizontal centerline. |
| 3. |
| Construct a circle concentric to circle 1, tangent to circle 2 at the righthand side. |
| 4. |
| Construct the inscribed hexagon (regular 6-sided polygon) of circle 3, pointing to the right. |
| 5. |
| Copy circle 1 six times, to the angular points of hexagon 4. |
| 6. |
| Construct the inscribed equilateral triangle of circle 1, pointing up. |
| 7. |
| Construct a circle, passing through the lower two angular points of hexagon 4, and tangent to the lower side of triangle 6. |
| 8. |
| Construct a circle concentric to circle 1, passing through the center of circle 7. |
| 9. |
| Construct the inscribed hexagon of circle 8, pointing down. |
| 10. |
| Copy circle 7 five times, to the other angular points of hexagon 9. |
| 11. |
| Construct the inscribed circle of triangle 6. |
| 12. |
| Construct the inscribed hexagon of circle 11, pointing down. |
| 13. |
| Construct the inscribed circle of hexagon 12. |
| 14. |
| Construct the inscribed circle of hexagon 4. |
| 15. |
| Construct the circumscribed equilateral triangle of circle 14, pointing down. |
| 16. |
| Copy circle 13 to the lower angular point of triangle 15. |
| 17. |
| Construct a circle concentric to circle 1, tangent to circle 16 at the lower side. |
| 18. |
| Circles 1, 5, 7, 8, 10, 13, and 17, are used for the final reconstruction. |
| 19. |
| Remove all parts not visible within the formation itself. |
| 20. |
| Colour all areas corresponding to standing... |
| 21. |
| ...or to flattened crop, and finish the reconstruction of the 2016 Chilcomb Down formation. |
| 22. |
| The final result, matched with the aerial image. |
| Copyright © 2016, Zef Damen, The Netherlands |